
PromptLabHub
Sketch Portrait Winter Dramatic Natural Bokeh
0
Prompt

Sketch Portrait Winter Dramatic Natural Bokeh

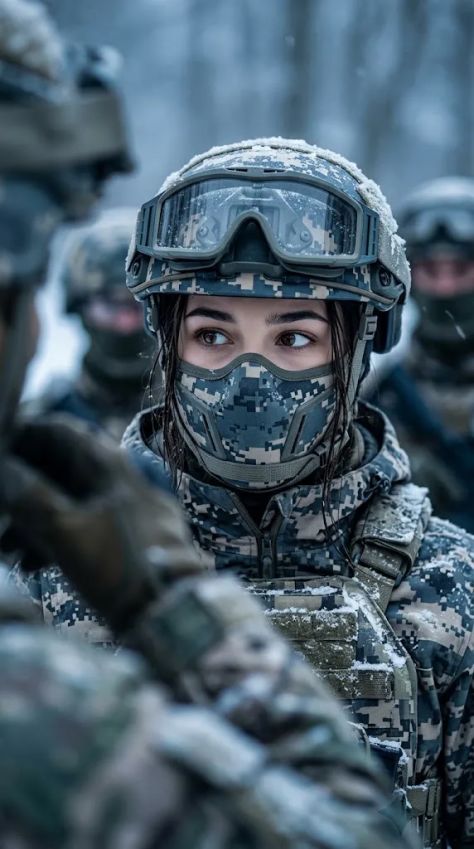
Use the uploaded image as the main visual reference. Recreate the same centrally framed cold-weather tactical subject, same digital-camouflage protective helmet, same goggles mounted above the eyes, same structured lower-face covering, same layered camouflage shell, same chest protection, same dark insulated gloves, same snow accumulation, same blurred foreground tactical figure at frame-left, same defocused additional figures behind the primary subject, same cold outdoor environment, same tight chest-up framing, and same cinematic blue-gray atmosphere. Do not invent a different face, different tactical equipment, different gaze, different camouflage palette, different environmental conditions, additional accessories, or a new camera angle. Follow the uploaded image closely and apply only the precision instructions below.

Generate a highly polished photorealistic cinematic tactical fashion portrait in a 9:16 vertical composition. Use a tight chest-up crop with the primary subject centered precisely in the frame, the protective helmet occupying the upper-center region, and the visible upper facial plane forming the critical focal point. Allow a heavily defocused partial tactical figure, helmet, and raised gloved forearm to intrude naturally along frame-left as a foreground occlusion. Keep at least two similarly equipped figures visible as strongly blurred silhouettes behind the main subject, including a masked helmeted figure toward frame-right. Use an eye-level, near-frontal camera position with the head level and the torso nearly frontal with only slight rotation. Use approximately 85 mm portrait-equivalent compression, f/2.2 aperture behavior, very shallow depth of field, grain level 2/10, and post-processing intensity approximately 7/10.

Preserve the exact visible facial identity and upper-face proportions from the uploaded image. Maintain the same forehead width, brow spacing, eye placement, upper-nose geometry, eyelid proportions, and visible upper-cheek structure. Do not extrapolate or expose facial regions hidden by the covering. Keep the lower nose, mouth, lips, jawline, chin, and lower cheeks fully concealed throughout the image.

Render the exposed skin as a light-to-medium warm beige base around H 28–34°, low saturation and medium-high brightness, modified by cool environmental illumination. Keep illuminated forehead and upper-cheek regions warmer and slightly brighter, while the eye sockets and areas under the helmet brim transition into cooler, lower-brightness shadow values. Maintain a matte-to-satin skin response with extremely restrained reflectivity.

Maintain visible-skin retouching at approximately 6/10. Smooth and refine the forehead, upper cheeks, temples, and nose-bridge region while retaining fine natural microtexture around the eyes, brows, and upper nose. Preserve subtle eyelid folds, eyebrow hairs, lash roots, small tonal transitions, and minor moisture-related texture. Keep pores subdued but not completely erased. Do not render coarse untreated skin and do not flatten the visible facial plane into textureless plastic.

Preserve both eyes as large almond shapes with slightly rounded central openings and subtly elevated outer corners. Keep the same eye openness as the uploaded reference. Direct both eyes strongly toward frame-left. The gaze must remain laterally oriented and must not intersect the camera. Do not redirect either eye toward the lens, upward, downward, or toward frame-right.

Render the irises as very dark brown-to-charcoal around H 20–30° with extremely low saturation and low brightness under the cool light. Maintain slightly lighter internal radial structure and darker outer limbal rings. Keep the pupils medium-sized and near-black. Add small cool-neutral catchlights in the upper regions of both eyes around 6500–7500 K equivalent. Do not enlarge the pupils, brighten the irises unnaturally, or add luminous eye effects.

Keep the upper eyelids clearly defined with a visible but restrained crease. Preserve soft neutral-brown-to-gray shading around H 25–35° at low saturation and low brightness along the upper lids and outer eye regions. Keep the shading minimal and naturally diffused. Add fine dark definition directly along the upper lash lines without creating a graphic wing.

Render the upper eyelashes dark, moderately long, and individually tapered, with subtle digital enhancement. Keep the lower lashes lighter and less dense. Preserve light-to-moderate lash darkening rather than exaggerated false lashes.

Maintain dark medium-thick brows with softly shaped arches, natural density, visible individual hairs, and restrained grooming. Use deep neutral brown around H 20–30°, low saturation and low brightness. Keep the brows mostly level, with only slight natural inner tension. Do not overarch, thin, bleach, laminate, or block-fill them.

Use only light-to-medium complexion coverage on the visible upper face. Do not introduce distinct blush, heavy contour, glitter, strong highlight products, or additional cosmetic elements. Keep the visible makeup limited to an even complexion, very subtle neutral eye shading, fine upper-lash definition, moderate lash enhancement, and natural dark brows.

Preserve the upper-face expression mechanics: brows mostly level, eyes moderately open, gaze turned toward frame-left, frontalis relaxed, and orbicularis oculi minimally contracted. Because the lower facial musculature remains concealed, do not imply a visible smile, pout, exposed mouth shape, or jaw expression.

Keep dark brown-to-near-black hair visible only around the temples, forehead edges, and sides of the face. Use H 20–30° at very low saturation and very low brightness, with cool silver-blue specular contamination from the environment. Maintain straight-to-slightly-wavy fiber behavior with a damp appearance caused by snow or moisture.

Allow several thin loose strands to cross the forehead and temple area. Add a few wet-looking flyaway fibers alongside the face. Give the hair a satin-to-wet finish with narrow cool highlights following individual strand direction. Keep the part mostly hidden beneath the helmet. Do not introduce voluminous styling, curls, braids, bright hair color, or dry salon-finished hair.

Preserve the digital-camouflage protective helmet exactly in overall scale, placement, and shape. Render the shell using pixelated blocks of blue-gray around H 205–220°, low-to-medium saturation and medium-low brightness; charcoal with near-zero saturation and low brightness; muted beige-gray around H 30–40°, low saturation and medium brightness; and restrained muted brown around H 25–35°, low saturation and medium-low brightness.

Give the helmet a hard molded shell with a matte-to-low-satin finish and fine surface grain. Add scattered snow accumulation along the upper shell, front edges, recessed pattern areas, and around the goggle assembly. Keep snow deposits irregular, clumped, and physically attached rather than evenly sprayed.

Mount the large protective goggles above the eyes on the helmet rather than over the face. Preserve the thick dark charcoal-to-near-black goggle frame with a matte finish and dimensional molded structure. Maintain the large dark smoky lens as a glossy transparent surface with strong environmental reflections.

Render the goggle lens in deep blue-charcoal around H 210–220° with very low saturation and low brightness, allowing soft reflected pale sky, snow, and blurred environmental shapes. Add scattered snow crystals, wet specks, and small moisture spots across the outer lens. Keep the goggle surface reflective and transparent enough to feel like real protective optics without revealing an artificial interior.

Preserve the structured digital-camouflage face covering across the lower face. Cover the lower nose, mouth, lips, jaw, chin, and lower cheeks completely. Keep the covering shaped closely to the facial structure while remaining visibly textile-based and reinforced rather than skin-tight.

Render the face covering from technical woven fabric with visible fine grid structure, layered seams, shaped panel construction, and mild rigid-looking reinforcement through the lower section. Use the same pixelated blue-gray, charcoal, beige-gray, and muted brown camouflage system as the helmet. Keep the finish matte with extremely low specularity.

Add irregular snow deposits and wet flecks to the face covering. Concentrate small white clusters around exposed upper edges, seams, protruding folds, and selected front-facing zones. Keep the snow cool neutral-white with pale blue contamination rather than warm white.

Preserve the outer cold-weather tactical shell using dense technical woven fabric. Recreate the matching digital camouflage in blue-gray around H 205–220°, charcoal, muted beige-gray around H 25–40°, and low-saturation cool gray. Maintain crisp seams, reinforced panels, overlapping textile construction, folds, compression lines, and layered shoulder structures.

Keep the outer shell matte-to-low-satin. Render individual snow crystals, small wet patches, icy flecks, and accumulated snow along upper-facing folds, shoulders, collar zones, and exposed edges. Do not make the technical fabric glossy, rubbery, or plastic.

Preserve the structured chest protection at the center of the frame. Use blue-gray and charcoal camouflage surfaces combining semirigid protective panels with woven textile components. Include dark webbing straps, adjustment bands, small buckles, attachment loops, and layered protective construction. Maintain believable mechanical alignment and functional seam placement.

Keep the chest panel visually dark and slightly lower in brightness than the visible face. Use matte-to-low-satin hard protective surfaces and heavily matte woven straps. Preserve small snow patches on upper-facing edges and recesses.

Add layered shoulder equipment and protective outerwear matching the reference. Maintain compact functional shapes, multiple overlapping technical textile planes, reinforced seams, and small areas of semirigid protection. Do not invent oversized armor plates, futuristic exoskeleton components, bright insignia, or decorative elements.

Preserve at least one dark insulated tactical-style gloved forearm occupying the frame-left foreground. Keep this foreground element heavily out of focus because it sits substantially closer to the camera than the main subject. Use deep blue-charcoal and near-black values with scattered snow accumulation. The exact fingers should remain obscured by blur, crop, and equipment overlap.

Keep the foreground figure at frame-left as a partial blurred tactical presence rather than an identifiable secondary portrait. Show only an indistinct portion of a helmet, upper facial zone, protective clothing, and raised arm/forearm. Keep this layer strongly defocused so it frames the main subject without competing for attention.

Preserve at least two background figures. Place one blurred masked tactical figure toward frame-right with helmet/goggle silhouette and dark face covering. Keep another similarly equipped figure partly visible deeper behind the main subject. Render both with the same cold blue-gray camouflage family and snow-covered equipment but strongly reduce facial and textile detail through shallow depth of field.

Do not add additional foreground or background figures beyond what is required to recreate the extracted composition. Keep all secondary figures visually subordinate and anonymous, with no readable facial detail.

Keep conventional jewelry absent. No visible necklace, earrings, rings, bracelet, or watch. No conventional glasses. The only eyewear is the protective goggle assembly mounted on the helmet. Do not add decorative accessories.

Do not add a recognizable held object. Keep the raised foreground glove/forearm ambiguous and partially cropped. Do not place weapons, tools, radios, or other handheld equipment into the subject’s hands unless already structurally obscured and unreadable in the reference.

Build the scene as four depth layers. Layer one is the strongly blurred frame-left foreground figure and raised gloved forearm. Layer two is the sharply rendered primary subject, with critical focus on both eyes, brows, upper facial skin, helmet edge, and central face-covering detail. Layer three contains at least two heavily defocused tactical figures behind the subject. Layer four is a pale, cold, softly blurred snowy environment with mild atmospheric softness and no readable architecture.

Keep the background cold and low-detail. Use pale icy blue around H 205–215° at low saturation and high brightness, cool gray around H 210–220° at extremely low saturation and medium brightness, and deep blue-gray shadow shapes behind the secondary figures. Do not introduce warm sunlight, green vegetation, urban signage, interior architecture, or saturated colors.

Maintain soft irregular background blur rather than distinct circular bokeh orbs. Allow pale snowy regions and dark tactical silhouettes to melt smoothly into each other. Keep the primary eyes as the strongest high-frequency detail in the image.

Preserve visible snow across the helmet, goggles, face covering, chest equipment, shoulder areas, foreground arm, and background figures. Render snow as irregular clusters of crystalline off-white material with subtle pale-blue environmental contamination. Include tiny granular crystals, compact soft clumps, and occasional partially melted wet edges.

Add only a few subtle suspended snowflakes or bright moisture points through the foreground and background. Keep them sparse, small, and optically soft. Do not create a dense active snowstorm, long falling streaks, or dramatic particle effects.

Use a large diffuse outdoor daylight source from approximately the 10–11 o’clock position at upper-left-front. Set the key equivalent to approximately 7000 K, within the 6500–7500 K cool daylight range. Keep the source extremely broad and soft, consistent with overcast snowy conditions.

Illuminate the forehead, upper nose bridge, visible upper cheeks, upper helmet surfaces, goggles, snow crystals, and exposed equipment facing frame-left. Keep the shadow transitions soft and gradual. Do not create hard sunlight or dramatic spotlighting.

Allow the helmet brim to produce a soft controlled shadow over the eye sockets while keeping both eyes clearly readable. Maintain deeper shadows along the lower face covering, chest recesses, shoulder overlaps, strap intersections, and behind the foreground arm.

Use approximately 45% fill generated by the bright snowy environment. Preserve detail in dark tactical surfaces while retaining enough contrast to separate overlapping straps, panels, goggles, mask folds, and background silhouettes.

Add subtle cool blue-gray bounce from surrounding snow onto the underside of the helmet, visible skin, mask edges, chest panel, glove, and frame-right equipment. Keep this bounce around H 205–220° with low saturation and medium brightness. Do not introduce warm gold or orange bounce.

Maintain a subtle cool rim or edge separation along the frame-right side of the helmet, hair strands, shoulder equipment, and selected face-covering edges. Keep this rim physically soft and narrow rather than a glowing outline.

Shape highlights by material. On exposed skin, use broad matte-to-satin highlights. On wet hair strands, use narrow cool specular lines. On the matte helmet shell, use subdued broad reflections. On the glossy goggle lens, create the strongest large environmental reflections. On snow, use small bright crystalline points and soft high-brightness clumps. On technical fabric, use diffuse low-intensity reflections following folds. On wet flecks, use tiny harder specular highlights.

Maintain the dominant palette precisely: blue-gray around H 205–220° with low-to-medium saturation; cool charcoal with very low saturation and low brightness; muted camouflage beige around H 25–40° with low saturation; cool black around H 210–220° with extremely low brightness; pale icy blue around H 200–215° with low saturation and high brightness; and cool neutral-white snow with subtle pale-blue contamination.

Keep exposed skin warmer than the environment, around H 28–34°, low saturation and medium-high brightness, but allow substantial cool environmental contamination so it remains integrated into the cold scene.

Apply a cold cinematic blue-gray grade with muted overall saturation, cool blue shadows, pale icy highlights, restrained warm skin, deep charcoal tactical surfaces, and enhanced snow separation. Keep the palette desaturated and controlled rather than bright military camouflage.

Use cool blue shadow split-toning against neutral-to-slightly-warm exposed skin. Keep the overall visual temperature distinctly cool. Do not introduce teal-and-orange blockbuster grading, saturated cyan, vivid beige, green, red, or warm sunset light.

Use very shallow depth of field. Keep both primary eyes, brows, lashes, central upper face, nearest face-covering structure, and selected helmet edges extremely sharp. Maintain high detail in the closest central snow crystals and camouflage weave. Let the foreground figure, raised arm, rear tactical figures, and environmental background blur strongly.

Allow the goggles and chest equipment to remain readable but slightly less sharp than the primary eye plane depending on their distance from focus. Do not render every tactical layer uniformly sharp.

Use approximately 70–100 mm portrait-equivalent optics with realistic facial and helmet compression. Preserve natural proportions and avoid wide-angle enlargement of the nose, goggles, helmet, or foreground arm.

Render at maximum photorealistic cinematic photography quality with believable exposed-skin anatomy, accurate dark-eye geometry, precise lash and brow detail, realistic damp hair strands, molded helmet surfaces, glossy goggle optics, technical camouflage weave, matte reinforced mask material, layered chest equipment, dark webbing, snow crystals, moisture speckling, and physically plausible shallow-depth optics.

Maintain grain around 2/10. Apply post-processing at approximately 7/10 with strong localized eye sharpening, restrained skin refinement, cool color grading, enhanced snow detail, controlled highlights, high textile microcontrast in the main focal plane, and deep but readable tactical shadows.

Follow the uploaded image as the primary reference. Preserve the exact central face placement, direct frontal head orientation, strong frame-left gaze, visible forehead and eyes, fully concealed lower face, digital-camouflage helmet, goggles mounted above the eyes, snowy face covering, damp dark hair strands, cold-weather shell, central chest protection, blurred foreground figure and arm at frame-left, defocused tactical figures behind, cool snowy environment, shallow depth of field, and 9:16 vertical framing.

Keep both dark almond-shaped eyes open and directed strongly toward frame-left with small cool upper catchlights. Do not redirect the gaze toward the camera.

Keep the lower face completely concealed. Do not expose the lower nose, mouth, lips, teeth, jawline, chin, or lower cheeks.

Preserve only the visible makeup configuration: light-to-medium complexion coverage on exposed skin, extremely subtle neutral-brown/gray eyelid shading, fine dark upper-lash definition, moderately enhanced lashes, and natural dark brows. Do not add stronger eye makeup, vivid cosmetics, or any visible lower-face makeup.

Maintain skin retouching at approximately 6/10. Preserve smooth upper-face skin with fine natural detail around the eyes and nose bridge while keeping lashes, brows, eyelid structure, and damp hair strands sharply resolved. Do not over-smooth into plastic skin.

No readable text. No readable insignia. No logos. No watermark. No visible jewelry. No conventional glasses. No uncovered mouth. No uncovered jaw. No uncovered chin. No additional accessories. No clearly identifiable held object. No active rainfall. No heavy snowfall. No lens flare. No chromatic aberration. No exaggerated bloom. No fisheye distortion. No anatomical errors. No plastic skin. No glossy camouflage textile. No futuristic armor. No saturated warm lighting. Ultra-high resolution. Sharp lateral eye gaze. Crisp snow crystals. Realistic goggle reflections. Fine technical-fabric weave. Damp dark hair detail. Physically plausible cold-weather tactical photography only.

·
Photo Prompts

レビュー

レビューするにはログインしてください。

まだレビューはありません。最初のレビューを書きましょう。

どのデバイスでも PromptLabHub を。

アプリをインストールしてすばやく開くか、Chrome 拡張機能をダウンロードしてブラウザに読み込めます。

プロンプトを見る

  • すべての Prompt
  • 写真 Prompt
  • 動画 Prompt
  • フード Prompt

作成

  • Prompt を投稿

コミュニティ

  • フォーラム
  • クリエイター
  • リーダーボード
  • ウィークリーチャレンジ

サポート

  • よくある質問
  • お問い合わせ
  • プライバシーポリシー
  • 利用規約

フォローする

Midjourney、DALL-E 3、Sora、Runway など向けの厳選 AI Prompt を発見してコピー。毎週更新。

プライバシーポリシー利用規約Cookie ポリシー

© 2026 PromptLabHub. All rights reserved.

© 2026 PromptLabHub. All rights reserved.

·
プライバシーポリシー·利用規約·Cookie ポリシー
Home
PromptLabHub
Sketch Portrait Winter Dramatic Natural Bokeh
0
Prompt

Sketch Portrait Winter Dramatic Natural Bokeh

Use the uploaded image as the main visual reference. Recreate the same centrally framed cold-weather tactical subject, same digital-camouflage protective helmet, same goggles mounted above the eyes, same structured lower-face covering, same layered camouflage shell, same chest protection, same dark insulated gloves, same snow accumulation, same blurred foreground tactical figure at frame-left, same defocused additional figures behind the primary subject, same cold outdoor environment, same tight chest-up framing, and same cinematic blue-gray atmosphere. Do not invent a different face, different tactical equipment, different gaze, different camouflage palette, different environmental conditions, additional accessories, or a new camera angle. Follow the uploaded image closely and apply only the precision instructions below.

Generate a highly polished photorealistic cinematic tactical fashion portrait in a 9:16 vertical composition. Use a tight chest-up crop with the primary subject centered precisely in the frame, the protective helmet occupying the upper-center region, and the visible upper facial plane forming the critical focal point. Allow a heavily defocused partial tactical figure, helmet, and raised gloved forearm to intrude naturally along frame-left as a foreground occlusion. Keep at least two similarly equipped figures visible as strongly blurred silhouettes behind the main subject, including a masked helmeted figure toward frame-right. Use an eye-level, near-frontal camera position with the head level and the torso nearly frontal with only slight rotation. Use approximately 85 mm portrait-equivalent compression, f/2.2 aperture behavior, very shallow depth of field, grain level 2/10, and post-processing intensity approximately 7/10.

Preserve the exact visible facial identity and upper-face proportions from the uploaded image. Maintain the same forehead width, brow spacing, eye placement, upper-nose geometry, eyelid proportions, and visible upper-cheek structure. Do not extrapolate or expose facial regions hidden by the covering. Keep the lower nose, mouth, lips, jawline, chin, and lower cheeks fully concealed throughout the image.

Render the exposed skin as a light-to-medium warm beige base around H 28–34°, low saturation and medium-high brightness, modified by cool environmental illumination. Keep illuminated forehead and upper-cheek regions warmer and slightly brighter, while the eye sockets and areas under the helmet brim transition into cooler, lower-brightness shadow values. Maintain a matte-to-satin skin response with extremely restrained reflectivity.

Maintain visible-skin retouching at approximately 6/10. Smooth and refine the forehead, upper cheeks, temples, and nose-bridge region while retaining fine natural microtexture around the eyes, brows, and upper nose. Preserve subtle eyelid folds, eyebrow hairs, lash roots, small tonal transitions, and minor moisture-related texture. Keep pores subdued but not completely erased. Do not render coarse untreated skin and do not flatten the visible facial plane into textureless plastic.

Preserve both eyes as large almond shapes with slightly rounded central openings and subtly elevated outer corners. Keep the same eye openness as the uploaded reference. Direct both eyes strongly toward frame-left. The gaze must remain laterally oriented and must not intersect the camera. Do not redirect either eye toward the lens, upward, downward, or toward frame-right.

Render the irises as very dark brown-to-charcoal around H 20–30° with extremely low saturation and low brightness under the cool light. Maintain slightly lighter internal radial structure and darker outer limbal rings. Keep the pupils medium-sized and near-black. Add small cool-neutral catchlights in the upper regions of both eyes around 6500–7500 K equivalent. Do not enlarge the pupils, brighten the irises unnaturally, or add luminous eye effects.

Keep the upper eyelids clearly defined with a visible but restrained crease. Preserve soft neutral-brown-to-gray shading around H 25–35° at low saturation and low brightness along the upper lids and outer eye regions. Keep the shading minimal and naturally diffused. Add fine dark definition directly along the upper lash lines without creating a graphic wing.

Render the upper eyelashes dark, moderately long, and individually tapered, with subtle digital enhancement. Keep the lower lashes lighter and less dense. Preserve light-to-moderate lash darkening rather than exaggerated false lashes.

Maintain dark medium-thick brows with softly shaped arches, natural density, visible individual hairs, and restrained grooming. Use deep neutral brown around H 20–30°, low saturation and low brightness. Keep the brows mostly level, with only slight natural inner tension. Do not overarch, thin, bleach, laminate, or block-fill them.

Use only light-to-medium complexion coverage on the visible upper face. Do not introduce distinct blush, heavy contour, glitter, strong highlight products, or additional cosmetic elements. Keep the visible makeup limited to an even complexion, very subtle neutral eye shading, fine upper-lash definition, moderate lash enhancement, and natural dark brows.

Preserve the upper-face expression mechanics: brows mostly level, eyes moderately open, gaze turned toward frame-left, frontalis relaxed, and orbicularis oculi minimally contracted. Because the lower facial musculature remains concealed, do not imply a visible smile, pout, exposed mouth shape, or jaw expression.

Keep dark brown-to-near-black hair visible only around the temples, forehead edges, and sides of the face. Use H 20–30° at very low saturation and very low brightness, with cool silver-blue specular contamination from the environment. Maintain straight-to-slightly-wavy fiber behavior with a damp appearance caused by snow or moisture.

Allow several thin loose strands to cross the forehead and temple area. Add a few wet-looking flyaway fibers alongside the face. Give the hair a satin-to-wet finish with narrow cool highlights following individual strand direction. Keep the part mostly hidden beneath the helmet. Do not introduce voluminous styling, curls, braids, bright hair color, or dry salon-finished hair.

Preserve the digital-camouflage protective helmet exactly in overall scale, placement, and shape. Render the shell using pixelated blocks of blue-gray around H 205–220°, low-to-medium saturation and medium-low brightness; charcoal with near-zero saturation and low brightness; muted beige-gray around H 30–40°, low saturation and medium brightness; and restrained muted brown around H 25–35°, low saturation and medium-low brightness.

Give the helmet a hard molded shell with a matte-to-low-satin finish and fine surface grain. Add scattered snow accumulation along the upper shell, front edges, recessed pattern areas, and around the goggle assembly. Keep snow deposits irregular, clumped, and physically attached rather than evenly sprayed.

Mount the large protective goggles above the eyes on the helmet rather than over the face. Preserve the thick dark charcoal-to-near-black goggle frame with a matte finish and dimensional molded structure. Maintain the large dark smoky lens as a glossy transparent surface with strong environmental reflections.

Render the goggle lens in deep blue-charcoal around H 210–220° with very low saturation and low brightness, allowing soft reflected pale sky, snow, and blurred environmental shapes. Add scattered snow crystals, wet specks, and small moisture spots across the outer lens. Keep the goggle surface reflective and transparent enough to feel like real protective optics without revealing an artificial interior.

Preserve the structured digital-camouflage face covering across the lower face. Cover the lower nose, mouth, lips, jaw, chin, and lower cheeks completely. Keep the covering shaped closely to the facial structure while remaining visibly textile-based and reinforced rather than skin-tight.

Render the face covering from technical woven fabric with visible fine grid structure, layered seams, shaped panel construction, and mild rigid-looking reinforcement through the lower section. Use the same pixelated blue-gray, charcoal, beige-gray, and muted brown camouflage system as the helmet. Keep the finish matte with extremely low specularity.

Add irregular snow deposits and wet flecks to the face covering. Concentrate small white clusters around exposed upper edges, seams, protruding folds, and selected front-facing zones. Keep the snow cool neutral-white with pale blue contamination rather than warm white.

Preserve the outer cold-weather tactical shell using dense technical woven fabric. Recreate the matching digital camouflage in blue-gray around H 205–220°, charcoal, muted beige-gray around H 25–40°, and low-saturation cool gray. Maintain crisp seams, reinforced panels, overlapping textile construction, folds, compression lines, and layered shoulder structures.

Keep the outer shell matte-to-low-satin. Render individual snow crystals, small wet patches, icy flecks, and accumulated snow along upper-facing folds, shoulders, collar zones, and exposed edges. Do not make the technical fabric glossy, rubbery, or plastic.

Preserve the structured chest protection at the center of the frame. Use blue-gray and charcoal camouflage surfaces combining semirigid protective panels with woven textile components. Include dark webbing straps, adjustment bands, small buckles, attachment loops, and layered protective construction. Maintain believable mechanical alignment and functional seam placement.

Keep the chest panel visually dark and slightly lower in brightness than the visible face. Use matte-to-low-satin hard protective surfaces and heavily matte woven straps. Preserve small snow patches on upper-facing edges and recesses.

Add layered shoulder equipment and protective outerwear matching the reference. Maintain compact functional shapes, multiple overlapping technical textile planes, reinforced seams, and small areas of semirigid protection. Do not invent oversized armor plates, futuristic exoskeleton components, bright insignia, or decorative elements.

Preserve at least one dark insulated tactical-style gloved forearm occupying the frame-left foreground. Keep this foreground element heavily out of focus because it sits substantially closer to the camera than the main subject. Use deep blue-charcoal and near-black values with scattered snow accumulation. The exact fingers should remain obscured by blur, crop, and equipment overlap.

Keep the foreground figure at frame-left as a partial blurred tactical presence rather than an identifiable secondary portrait. Show only an indistinct portion of a helmet, upper facial zone, protective clothing, and raised arm/forearm. Keep this layer strongly defocused so it frames the main subject without competing for attention.

Preserve at least two background figures. Place one blurred masked tactical figure toward frame-right with helmet/goggle silhouette and dark face covering. Keep another similarly equipped figure partly visible deeper behind the main subject. Render both with the same cold blue-gray camouflage family and snow-covered equipment but strongly reduce facial and textile detail through shallow depth of field.

Do not add additional foreground or background figures beyond what is required to recreate the extracted composition. Keep all secondary figures visually subordinate and anonymous, with no readable facial detail.

Keep conventional jewelry absent. No visible necklace, earrings, rings, bracelet, or watch. No conventional glasses. The only eyewear is the protective goggle assembly mounted on the helmet. Do not add decorative accessories.

Do not add a recognizable held object. Keep the raised foreground glove/forearm ambiguous and partially cropped. Do not place weapons, tools, radios, or other handheld equipment into the subject’s hands unless already structurally obscured and unreadable in the reference.

Build the scene as four depth layers. Layer one is the strongly blurred frame-left foreground figure and raised gloved forearm. Layer two is the sharply rendered primary subject, with critical focus on both eyes, brows, upper facial skin, helmet edge, and central face-covering detail. Layer three contains at least two heavily defocused tactical figures behind the subject. Layer four is a pale, cold, softly blurred snowy environment with mild atmospheric softness and no readable architecture.

Keep the background cold and low-detail. Use pale icy blue around H 205–215° at low saturation and high brightness, cool gray around H 210–220° at extremely low saturation and medium brightness, and deep blue-gray shadow shapes behind the secondary figures. Do not introduce warm sunlight, green vegetation, urban signage, interior architecture, or saturated colors.

Maintain soft irregular background blur rather than distinct circular bokeh orbs. Allow pale snowy regions and dark tactical silhouettes to melt smoothly into each other. Keep the primary eyes as the strongest high-frequency detail in the image.

Preserve visible snow across the helmet, goggles, face covering, chest equipment, shoulder areas, foreground arm, and background figures. Render snow as irregular clusters of crystalline off-white material with subtle pale-blue environmental contamination. Include tiny granular crystals, compact soft clumps, and occasional partially melted wet edges.

Add only a few subtle suspended snowflakes or bright moisture points through the foreground and background. Keep them sparse, small, and optically soft. Do not create a dense active snowstorm, long falling streaks, or dramatic particle effects.

Use a large diffuse outdoor daylight source from approximately the 10–11 o’clock position at upper-left-front. Set the key equivalent to approximately 7000 K, within the 6500–7500 K cool daylight range. Keep the source extremely broad and soft, consistent with overcast snowy conditions.

Illuminate the forehead, upper nose bridge, visible upper cheeks, upper helmet surfaces, goggles, snow crystals, and exposed equipment facing frame-left. Keep the shadow transitions soft and gradual. Do not create hard sunlight or dramatic spotlighting.

Allow the helmet brim to produce a soft controlled shadow over the eye sockets while keeping both eyes clearly readable. Maintain deeper shadows along the lower face covering, chest recesses, shoulder overlaps, strap intersections, and behind the foreground arm.

Use approximately 45% fill generated by the bright snowy environment. Preserve detail in dark tactical surfaces while retaining enough contrast to separate overlapping straps, panels, goggles, mask folds, and background silhouettes.

Add subtle cool blue-gray bounce from surrounding snow onto the underside of the helmet, visible skin, mask edges, chest panel, glove, and frame-right equipment. Keep this bounce around H 205–220° with low saturation and medium brightness. Do not introduce warm gold or orange bounce.

Maintain a subtle cool rim or edge separation along the frame-right side of the helmet, hair strands, shoulder equipment, and selected face-covering edges. Keep this rim physically soft and narrow rather than a glowing outline.

Shape highlights by material. On exposed skin, use broad matte-to-satin highlights. On wet hair strands, use narrow cool specular lines. On the matte helmet shell, use subdued broad reflections. On the glossy goggle lens, create the strongest large environmental reflections. On snow, use small bright crystalline points and soft high-brightness clumps. On technical fabric, use diffuse low-intensity reflections following folds. On wet flecks, use tiny harder specular highlights.

Maintain the dominant palette precisely: blue-gray around H 205–220° with low-to-medium saturation; cool charcoal with very low saturation and low brightness; muted camouflage beige around H 25–40° with low saturation; cool black around H 210–220° with extremely low brightness; pale icy blue around H 200–215° with low saturation and high brightness; and cool neutral-white snow with subtle pale-blue contamination.

Keep exposed skin warmer than the environment, around H 28–34°, low saturation and medium-high brightness, but allow substantial cool environmental contamination so it remains integrated into the cold scene.

Apply a cold cinematic blue-gray grade with muted overall saturation, cool blue shadows, pale icy highlights, restrained warm skin, deep charcoal tactical surfaces, and enhanced snow separation. Keep the palette desaturated and controlled rather than bright military camouflage.

Use cool blue shadow split-toning against neutral-to-slightly-warm exposed skin. Keep the overall visual temperature distinctly cool. Do not introduce teal-and-orange blockbuster grading, saturated cyan, vivid beige, green, red, or warm sunset light.

Use very shallow depth of field. Keep both primary eyes, brows, lashes, central upper face, nearest face-covering structure, and selected helmet edges extremely sharp. Maintain high detail in the closest central snow crystals and camouflage weave. Let the foreground figure, raised arm, rear tactical figures, and environmental background blur strongly.

Allow the goggles and chest equipment to remain readable but slightly less sharp than the primary eye plane depending on their distance from focus. Do not render every tactical layer uniformly sharp.

Use approximately 70–100 mm portrait-equivalent optics with realistic facial and helmet compression. Preserve natural proportions and avoid wide-angle enlargement of the nose, goggles, helmet, or foreground arm.

Render at maximum photorealistic cinematic photography quality with believable exposed-skin anatomy, accurate dark-eye geometry, precise lash and brow detail, realistic damp hair strands, molded helmet surfaces, glossy goggle optics, technical camouflage weave, matte reinforced mask material, layered chest equipment, dark webbing, snow crystals, moisture speckling, and physically plausible shallow-depth optics.

Maintain grain around 2/10. Apply post-processing at approximately 7/10 with strong localized eye sharpening, restrained skin refinement, cool color grading, enhanced snow detail, controlled highlights, high textile microcontrast in the main focal plane, and deep but readable tactical shadows.

Follow the uploaded image as the primary reference. Preserve the exact central face placement, direct frontal head orientation, strong frame-left gaze, visible forehead and eyes, fully concealed lower face, digital-camouflage helmet, goggles mounted above the eyes, snowy face covering, damp dark hair strands, cold-weather shell, central chest protection, blurred foreground figure and arm at frame-left, defocused tactical figures behind, cool snowy environment, shallow depth of field, and 9:16 vertical framing.

Keep both dark almond-shaped eyes open and directed strongly toward frame-left with small cool upper catchlights. Do not redirect the gaze toward the camera.

Keep the lower face completely concealed. Do not expose the lower nose, mouth, lips, teeth, jawline, chin, or lower cheeks.

Preserve only the visible makeup configuration: light-to-medium complexion coverage on exposed skin, extremely subtle neutral-brown/gray eyelid shading, fine dark upper-lash definition, moderately enhanced lashes, and natural dark brows. Do not add stronger eye makeup, vivid cosmetics, or any visible lower-face makeup.

Maintain skin retouching at approximately 6/10. Preserve smooth upper-face skin with fine natural detail around the eyes and nose bridge while keeping lashes, brows, eyelid structure, and damp hair strands sharply resolved. Do not over-smooth into plastic skin.

No readable text. No readable insignia. No logos. No watermark. No visible jewelry. No conventional glasses. No uncovered mouth. No uncovered jaw. No uncovered chin. No additional accessories. No clearly identifiable held object. No active rainfall. No heavy snowfall. No lens flare. No chromatic aberration. No exaggerated bloom. No fisheye distortion. No anatomical errors. No plastic skin. No glossy camouflage textile. No futuristic armor. No saturated warm lighting. Ultra-high resolution. Sharp lateral eye gaze. Crisp snow crystals. Realistic goggle reflections. Fine technical-fabric weave. Damp dark hair detail. Physically plausible cold-weather tactical photography only.

·
Photo Prompts

レビュー

レビューするにはログインしてください。

まだレビューはありません。最初のレビューを書きましょう。

どのデバイスでも PromptLabHub を。

アプリをインストールしてすばやく開くか、Chrome 拡張機能をダウンロードしてブラウザに読み込めます。

プロンプトを見る

  • すべての Prompt
  • 写真 Prompt
  • 動画 Prompt
  • フード Prompt

作成

  • Prompt を投稿

コミュニティ

  • フォーラム
  • クリエイター
  • リーダーボード
  • ウィークリーチャレンジ

サポート

  • よくある質問
  • お問い合わせ
  • プライバシーポリシー
  • 利用規約

フォローする

Midjourney、DALL-E 3、Sora、Runway など向けの厳選 AI Prompt を発見してコピー。毎週更新。

プライバシーポリシー利用規約Cookie ポリシー

© 2026 PromptLabHub. All rights reserved.

© 2026 PromptLabHub. All rights reserved.

·
プライバシーポリシー·利用規約·Cookie ポリシー
Home